
This post was originally published here April 7, 2014. I’ve since updated the text and photographs. This Canadian no-bake treat will quickly become a favorite in your house!
If you’ve been a long-time follower of Floating Kitchen (thank you!), you’ll probably remember that I used to live in Seattle, WA. It’s where this little blog was conceived and born. And it’s also where I fell in love with Nanaimo Bars.
Nanaimo Bars are a legendary Canadian dessert, named after the city from which they are claimed to have originated from, Nanaimo, British Columbia. Given the proximity of Washington to British Columbia, I would sometimes find Nanaimo Bars in bakeries around Seattle. But mostly, I’d indulge in them when I traveled up and across the border to Canada.
Nanaimo Bars aren’t something I can find here in New England, so I only get the pleasure of enjoying these decadent, three layer treats if I make them myself. But lucky for me (and for everyone!), they are easy enough to recreate at home!
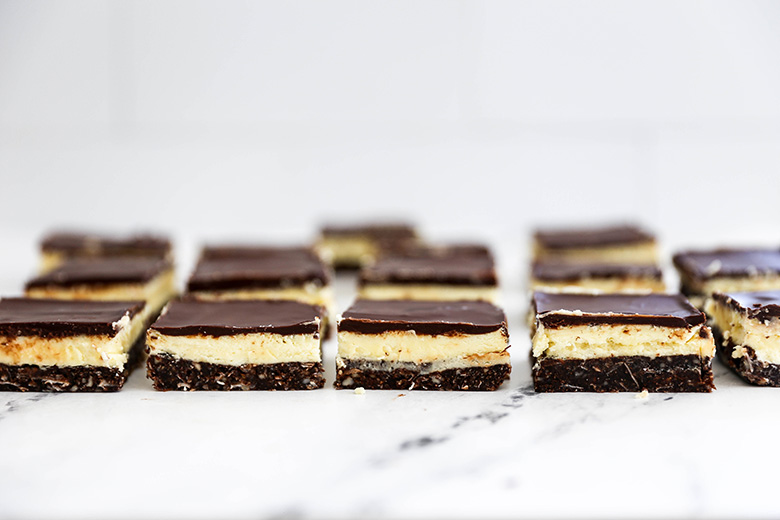
Nanaimo Bars consist of three distinct no-bake layers. The bottom layer is a thick, tightly packed layer of cocoa powder, graham cracker crumbs, ground almonds and shredded coconut. The middle layer is a rich, sweet vanilla buttercream-like frosting. And the top layer is a thin, smooth coating of chocolate.
See, I told you there was a lot to love about Nanaimo Bars!

As I mentioned above, these bars are completely no-bake. But you do need to allow time for each of the layers to chill properly before building the next. So plan for about 2 hours of inactive prep time when you’re making this recipe. Or better yet, plan to make them well in advance of when you plan to serve them. Nanaimo Bars can be stored for up to a week in your refrigerator. Which makes them a great make-ahead dessert for any occasion! I especially love them in the Springtime, because I just adore coconut-based treats this time of year. These Nanaimo Bars would be perfect for Easter!
I always used to make these in an 8 X 8-inch baking pan. Now I prefer using a 9 X 9-inch baking pan for an overall thinner bar. But both work, so use whatever you have available!
Cheers,
Liz

Nanaimo Bars
Ingredients
For the Bottom Layer:
- 1/2 cup (8 tablespoons) unsalted butter
- 5 tablespoons unsweetened cocoa powder
- 1/4 cup granulated sugar
- 1 egg, beaten
- 1 1/2 cups graham cracker crumbs
- 1 cup shredded/flaked unsweetened coconut
- 1/2 cup ground almonds
For the Middle Layer:
- 2 cups powdered sugar
- 1/2 cup (8 tablespoons) unsalted butter, softened at room temperature
- 2 tablespoons instant vanilla pudding mix
- 2 tablespoons heavy cream
For the Top Layer:
- 4 ounces semi-sweet or dark chocolate, chopped
- 1 1/2 tablespoons unsalted butter
Instructions
- Lightly spray an 8 X 8-inch or 9 X 9-inch baking pan with non-stick cooking spray. Set aside.
- In a saucepan over low-medium, melt the butter for the bottom layer. Once the butter is melted, whisk in the cocoa powder and sugar. While whisking, slowly add the beaten egg. Whisk for about 2 minutes until the mixture is slightly thicken. Remove the saucepan from the heat. Then stir in the graham cracker crumbs, coconut and ground almonds, stirring until all the dry ingredients are moistened. Dump the mixture into your prepared baking pan and spread it out evenly, pressing down firmly to make a flat surface. Place the baking pan in your refrigerator for 30 minutes to chill.
- In your stand mixer fitted with the paddle attachment, beat together all the ingredients for the middle layer, stopping to scrap down the sides of the bowl as necessary. Beat on medium-high speed for 4-5 minutes, or until the mixture is light and fluffy. Then using an off-set spatula, carefully spread this layer over the chilled bottom layer. Return the baking pan to your refrigerator for 10 minutes to chill.
- In a saucepan over low-medium heat, gently melt the chocolate and butter for the top layer, stirring constantly so it doesn’t burn. Once fully melted, remove the saucepan from the heat and let it stand for 5-10 minutes to cool slightly. Then using an off-set spatula, carefully spread this layer over the middle layer. Return the baking pan to your refrigerator for 8-10 minutes to partially set the top layer. Then “score” just the top layer into 16 squares using a sharp knife. The goal here isn’t to slice all the way through the bars. But rather just to trace where the bars will be sliced later.
- Return the baking pan to your refrigerator for 1 hour to fully chill and set the bars. Then using a sharp knife and wiping it clean in between uses, slice the bars using the score marks you made earlier as a guide.
- Nanaimo bars can be stored in an airtight container in your refrigerator for up to 1 week.
Notes
Recipe barely adapted from The City of Nanaimo.


Glad to hear you love Nanaimo’s signature treat! Next time you are visiting Vancouver Island you should check out the Nanaimo Bar Trail. The trail includes a group of Nanaimo restaurants and other local businesses and their take on our town’s classic treat. Along with delicious regular Nanaimo bars there is Nanaimo bar cheesecake, deep fried Nanaimo bars, Nanaimo bar martinis, and even a Nanaimo bar pedicure. Check out http://www.tourismnanaimo.com/cms.asp?wpID=9 for more information
I wished you’re were back so we could share these scrumptious bars! I’d absolutely devour these Liz! Thank you for the thinner bar… you know, gotta have portion control 😀
Somedays! 🙂
yum. so many fun flavors, love the almond coconut contrasted with the vanilla pudding and chocolate in all of these layers, have never heard of these before, saving for the weekend, thank you!
I hope you love them, Sabrina!