
Chocolate is probably my biggest weakness. I can “pass” on any other kind of food or dessert. But never chocolate. No matter how full I am, I ALWAYS have room for chocolate.
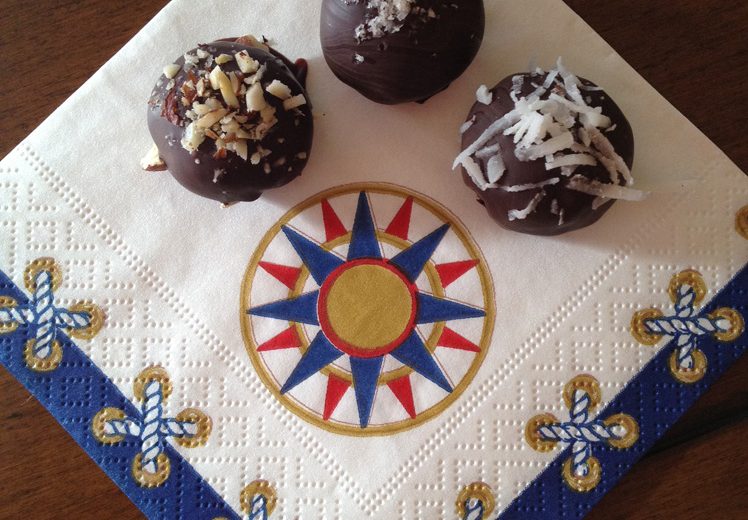
I learned how to make these Hand Rolled Dark Chocolate Ganache Truffles during a recent class I took at Theo Chocolate. Oh my – they are so delicious. The ganache filling just melts in your mouth. And the dark chocolate coating gives the perfect “snap” when you bite into it. You can get as creative and ambitious as you want with the coatings and decorations. I kept it pretty simple here, but in the Theo Chocolate class we had all kinds of stuff to play with: sea salts, nuts, dried chiles, toffee, crystallized ginger, coconut, candied coffee beans, bee pollen (yes, bee pollen) and more. You could also pipe on some designs with white chocolate. So get creative. These little gems make great gifts, if you can bear to part with them!
I ended up with about 60 small-ish truffles (imagine something slightly larger than a rounded Hershey kiss). But you can make them whatever size you like. Also, I may or may not have licked the spoon and bowl – like A LOT. Hey, I had to make sure everything was tasting good! This possibly could have reduced my final numbers – but don’t tell!
Before we get into the recipe, I just have to gush about Theo Chocolate for a minute. They are the first Organic and Fair Trade Bean-to-Bar Chocolate Factory in North America. And lucky for me they are located just a couple miles from my house! It’s pretty dangerous actually. I go there all the time – the smell of the roasting beans from the factory is intoxicating and just draws me in. Oh and the free samples – YUM! I’ve done the factory tour, taken two classes and even had a first date there. I just can’t seem to stay away from this place!
Theo Chocolate makes everything in small batch and they don’t add fillers, stabilizers or other unpronounceable ingredients to their chocolate. The true flavors of the beans are allowed to shine. I highly recommend trying to get your hands on some of their products.
Cheers,
Liz
Recipe from Theo Chocolate
I am in no way, shape, or form being compensated by Theo Chocolate for this post. I simply just can’t get enough of their products and want to spread the word to everyone about this fabulous company.


Ingredients
- For the Dark Chocolate Ganache
- 226 grams (1/2 lb) quality dark chocolate (NOT chocolate chips)
- 168 grams (6 oz) heavy whipping cream
- 1 tablespoon honey
- 1/2 vanilla bean, scraped
- 4 tablespoons unsalted butter, softened
- For the Tempered Chocolate (for enrobing the ganache)
- 1 lb good quality dark chocolate (NOT chocolate chips)
- For Decorating
- Nuts, salts, spices, sugars, candied fruits – whatever you like
- I used Australian pink sea salt, chopped hazelnuts and shredded coconut
- Special Equipment
- Instant read thermometer (this is really a must have when working with chocolate)
Instructions
- Make your ganache. Chop your chocolate bars into small pieces and set aside. Combine the cream, honey and vanilla bean in a small pan and bring to a simmer. Once the cream mixture reaches 145 degrees Fahrenheit, remove it from the heat source. Add in the chopped chocolate and let it sit for 1-2 minutes to begin to melt the chocolate. Stir together the chocolate and cream mixture until the chocolate is fully melted. Add in the room temperature butter, 1 tablespoon at a time, stirring after each addition to incorporate.
- Once the butter is fully incorporated, let the ganache sit at room temperature for about 5-7 minutes. This will give it time to thicken. It should appear glossy and if you dip a spoon in it, it should hold well to the spoon (and not drip off). If your ganache doesn’t appear thick enough you can stir in a bit more chopped chocolate and allow it to sit for a few more minutes at room temperature.
- While you are waiting for the ganache to thicken, line a baking sheet with parchment paper and get your piping bag ready. I made parchment paper piping bags/cones (which I prefer hands down over using plastic bags). They are easy to make and you can find instructional videos online.
- Fill your piping bag and pipe the ganache onto the parchment paper-lined baking sheet. They don’t have to look perfect. Your goal is really just to get them all about the same size. I piped mine into small “kisses” – but you can make them larger if you desire. Now you must wait. Ideally, the ganache should be allowed to sit overnight to firm up. But you can cheat and put the baking sheet in the refrigerator for a few hours if you are in a rush. I ended up leaving my baking sheet out on the counter for several hours, then lightly covered it with parchment paper and slid it into the refrigerator until the next day.
- When the ganache is firm and ready to be dipped, roll each “kiss” into a ball and place back on the parchment paper-lined baking sheet. You want to handle each ball as little as possible so they don’t get too warm and soft. When you’ve finished rolling all the ganache, set the baking sheet aside while you temper your chocolate (if your ganache balls have gotten too warm and are starting to lose their shape, you can pop the baking sheet in the refrigerator while you temper the chocolate).
- Temper the chocolate for enrobing using the seeding method. Chop four of the five chocolate bars into small pieces. Melt this chopped chocolate using a double boiler. Once all the chocolate is melted, remove the bowl with the chocolate from the double boiler. Take the fifth chocolate bar and break it into two large pieces. Add these large pieces to the melted chocolate and stir using a spatula. These large pieces of chocolate will act as “seeds” to help achieve the desired crystalline structure of the cocoa butter. Keep stirring and take the temperature often with an instant read thermometer. Once the temperature reaches 86-90 degrees Fahrenheit, your chocolate will be in temper. This whole process will take several minutes. Once in temper, if you have any remaining solid chocolate seeds remove them so as not to further cool your tempered chocolate.
- Working with one ganache ball at a time, drop the ball into the tempered chocolate and roll around to completely coat. Remove from the chocolate with a fork and tap off the excess chocolate (this is important or you will end up with a puddle around the base of your truffle). Using your finger or another fork, slide the coated ganache truffle off the fork onto a parchment paper-line baking sheet. Add the decoration of your choice. Wipe your utensils clean and repeat until you are done with all your truffles.
- The chocolate enrobing should be completely set within a few minutes. But, you can leave them out on the parchment paper-line baking sheet for 30-60 minutes, just to be safe. Transfer to an air-tight container. The truffles should be good for 2-3 weeks, but honestly, mine have never lasted that long for me to fully test out their shelf life!
Notes
1. It’s important to use room temperature butter when making the ganache. If your butter is cold, it will bring down the temperature of your chocolate-cream mixture and you will have trouble fully melting and incorporating it. Another trick I learned in the Theo Chocolate class is to use silicon or wooden utensils when stirring your chocolate. Metal utensils will be colder and can bring down the temperature of your chocolate (this is especially important when you get to the tempering steps).
2. When rolling the ganache “kisses” into balls, if your hands start to get too warm and the ganache becomes difficult to work with, you can rinse or dunk your hands in cold water to cool them, then dry and continue rolling.
3. It’s important to use tempered chocolate for enrobing your ganache. Tempering is the process of melting the chocolate then cooling it to a specific temperature (in this case 86-90 degrees Fahrenheit). This process allows the cocoa butter crystals to align into an organized lattice/array. And this will give your chocolate shine and snap. If you have ever seen chocolate that is dull, white-ish and limp, that is chocolate that is “out of temper”. Tempered chocolate will also set/harden much more quickly (within minutes) than chocolate that is out of temper. If you have ever used melted chocolate and found it takes overnight or a stint in the refrigerator to set-up, that chocolate was out of temper. There are two main methods for tempering chocolate: (1) The seeding method, which I used here and (2) the table method. You can find much more information on chocolate tempering and these two methods online.
4. The best way to determine if your chocolate is in temper is to check the temperature with an instant read thermometer. But I also learned a quick trick in the Theo Chocolate class: dip a small piece of parchment paper into the chocolate and set it down to dry. If your chocolate is in temper, the chocolate on the parchment paper will dry quickly (within a couple minutes) and appear shiny.
5. Another thing I learned at the Theo Chocolate class was the importance of cleaning your dipping fork in between EACH truffle you dip. The reason for this is you don’t want to keep introducing cooled/hardened chocolate into your batch of tempered chocolate as this will change the temperature of your tempered chocolate. Another tip: don’t continually scrap down the sides of the bowl that contains your tempered chocolate. I know this is hard to avoid doing – especially if you are an obsessive neat freak like myself! You don’t want to do this for the same reasons that you don’t want to use a dipping fork with hardened/cooled chocolate on it – it will cause temperature fluctuations in your tempered chocolate, which is not a good thing. If your tempered chocolate starts getting too cool for any reason, you can stir in some warm melted chocolate and re-check the temperature with an instant read thermometer until you reach 86-90 degrees Fahrenheit. Alternately, if you were using a double boiler, you can briefly put your chocolate back over the warm water until the temperature is correct.
6. You need to temper a big enough batch of chocolate so you have plenty of room to fully submerge your ganache for the enrobing step. So when you have finished dipping, you will have a substantial amount of tempered chocolate left over. SERIOUS FIRST WORLD PROBLEM HERE! Pour out the left over tempered chocolate onto a parchment paper-line baking sheet, leave it plain or throw on some nuts/dried fruits/spices/whatever, let it harden, then break it up and store in an air tight container to be re-melted for another purpose or eaten!


Hi Liz,
First of all congrats on chasing your dreams !! I’m absolutely impressed. In the past I had seen all the pics of the delicious looking food you used o post on facebook. I’ve been following your blog and your instructions are detailed and meticulous. Absolutely fantastic ! I definitely am going to try some of these recipes. Keep up the good work !
Take care
Dhana
Thanks Dhana! I’m so glad you like the blog. I guess all those years of writing protocols has helped with the writing of nicely detailed recipes and instructions!