November 30, 2017
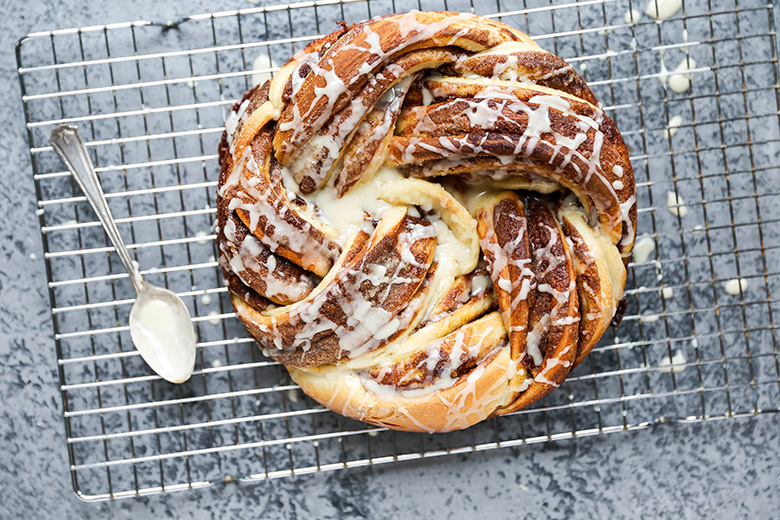
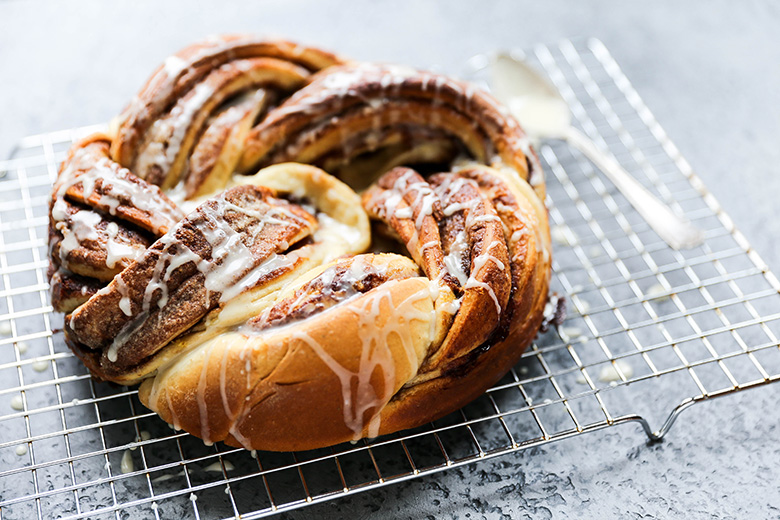
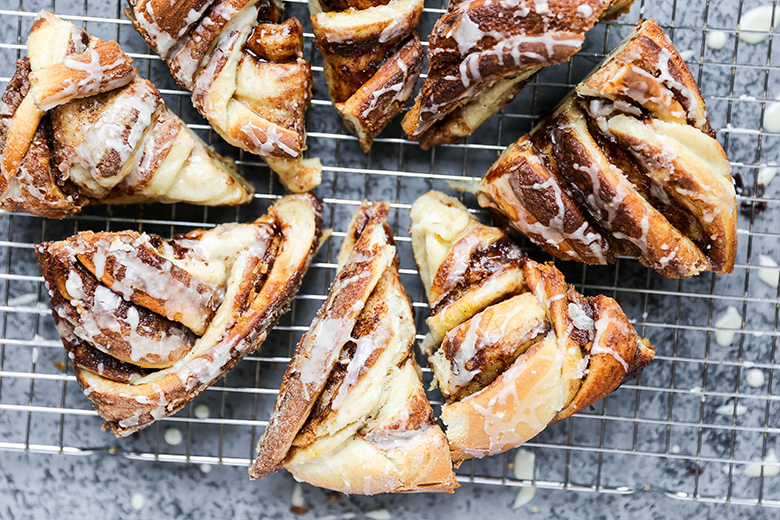
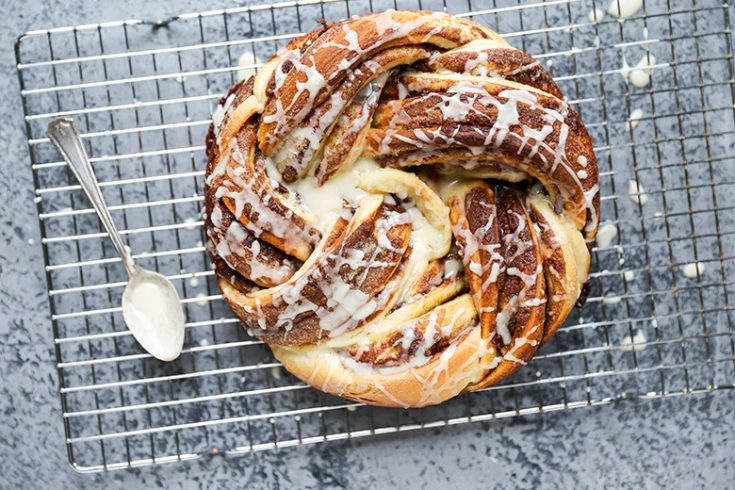
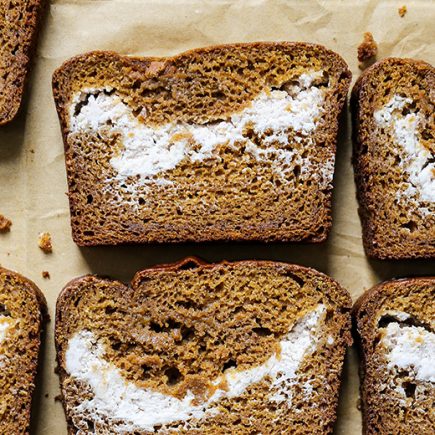
Braided Cardamom and Chocolate Hazelnut Bread
This post was originally published here on December 19, 2014. I’ve since updated the photographs and text. Please let me know if you try it out for the Holidays!
I think I’ve finally recovered enough from my post-Thanksgiving sluggish-ness (i.e. excessive pie and wine) to get started on some Christmas baking endeavors. Are you with me?
I sure hope so. Because today I’m bringing back an old favorite from way back in the day (circa 2014, which is like an eternity in the blog-o-sphere): my Braided Cardamom and Chocolate Hazelnut Bread.
I still remember the first time I ever made this recipe. Because as soon as I pulled it out of the oven, I immediately snapped a photo of the finished product and sent it to my Mom with the caption “Look! I made something pretty!”. I was so stupidly proud of how beautiful the bread turned out, that I just had to share that moment with someone. And my Mom was the obvious choice. Because really, who else can we brag to about all our accomplishments, even if they seem silly and insignificant?
In my eyes, however, this Braided Cardamom and Chocolate Hazelnut Bread was a masterpiece of epic proportions. Luckily, my Mom agreed with me.
Since that fateful day, I’ve made several other versions of this sweet, yeasted bread. The base recipe never fails to rise and bake up perfectly. And it’s show stopping presentation is one that always has my family and friends ooh-ing and aah-ing. It’s perfect for a special occasion, like Christmas brunch. Or for any weekend morning when you have a few hours of extra time on your hands. I love waking up early on a cold Winter morning to start the dough rising while I enjoy my first cup(s) of coffee. Nothing fills my kitchen with warmth and happiness like fresh, homemade baked goods.
Please don’t be intimated by the braiding part (steps 10 and 11 in the recipe instructions). It’s really not that complicated. And it doesn’t have to be perfect, either. The different sized swoops and swirls is what I think makes this bread feel so inviting and homey. It’s perfectly imperfect in all the best ways!
Cheers,
Liz
At a Glance:
Yield:
About 8 servings
Prep Time:
3 hours
Cook Time:
30 minutes
Total Time:
3 hours 30 minutes
Ingredients
For the Dough:
-
3 - 3 1/4 cups all-purpose flour
-
1/3 cup sugar
-
1 tsp. salt
-
1 tsp. ground cardamom
-
1 package (2 1/4 tsp.) active dry yeast
-
1 cup milk
-
1/4 cup (4 tablespoons) unsalted butter, room temperature
-
1 egg, lightly beaten
For the Filling:
-
1/2 cup sugar
-
1 tsp. ground cardamom
-
3 tablespoons unsalted butter
-
3 tablespoons chocolate-hazelnut spread (like Nutella)
-
Finely grated zest from 1 orange
For the Glaze:
-
1/2 cup confectioners sugar
-
1/4 tsp. ground cardamom
-
About 2 tablespoons orange juice
Instructions
- In the bowl of your stand mixer, whisk together 2 cups of the flour, the sugar, salt, ground cardamom and yeast. Switch to the dough hook attachment.
- Warm the milk to 120-130 degrees Fahrenheit. Add the butter and let it soften in the warmed milk. It doesn't have to melt completely, you just want it to be very soft. Then add this mixture along with the beaten egg to the dry ingredients. Beat on medium speed for 1-2 minutes, scraping down the sides of the bowl as necessary. Once the mixture is well combined, start slowly adding in more flour, about 1/4 cup at a time, until the dough is soft, easy to handle and easily leaves the side of the bowl. You'll need anywhere between 1 to 1 1/4 cups flour.
- Mix the dough on low-medium speed for about 5 minutes, pulling the dough down off the hook as needed. The dough should be smooth and elastic. Alternatively, you can knead the dough by hand on a lightly floured countertop for about 5 minutes.
- Gather up the dough with your hands and shape it into a ball. Transfer it to a lightly oiled bowl, turning the dough to coat it with a thin layer of oil on all sides. Then cover the bowl loosely with a thin kitchen towel and let the dough rise in a warm place for 1 to 1 1/2 hours, or until roughly doubled in size.
- Once the dough has risen, gently punch it down to deflate it. Remove it from the bowl and transfer it to a floured countertop. Then shape it with your hands into a rectangle. Next, use a rolling pin to roll the dough out into a 24 X 12-inch rectangle. This will take a little bit of time, because the dough can be fairly elastic and "springy" at first. If it's bouncing back too much, let the dough rest for a few minutes, then try rolling it out again.
- Once the dough is rolled out, make the filling. In a small bowl, stir together the sugar and cardamom and set it aside. In a separate microwave safe bowl, microwave the butter and chocolate-hazelnut spread for 20-30 seconds, or until the two are just soft enough to be well combined.
- Spread the softened butter/chocolate-hazelnut mixture out in a thin layer evenly over the surface of the dough, leaving about a 1/2-inch boarder around the edges. Then sprinkle the sugar/cardamom mixture evenly over the top. Finally, top with the orange zest.
- Beginning at one of the long edges of your rectangle, tightly roll up the dough into a log. Then pinch the edges of the dough together to seal the log as best you can.
- Spray a baking sheet and the ring of a 9- to 10-inch springform pan with non-stick cooking spray and set them both aside.
- Using a sharp knife, slice the roll lengthwise, creating two equal sized long halves, but leaving one end still attached by about 3/4-inch at the very end. Slightly rotate the halves outwards so the layers are facing upwards. Then starting from the end that is still attached, cross the two halves over each other. Continue doing this until you end up with a single twisted/braided rope. Pinch together the end of the rope.
- Gently slide the rope onto your greased baking sheet. Starting with one end, spiral the rope into a closed circle. The circle doesn’t have to be tight, because the bread will rise and puff up as it bakes, filling in any small spaces. But it shouldn’t have a large hole in the center, either (think about making a shape that resembles a snail shell, not a wreath). Tuck the very end of the rope under the circle so it doesn't stick out.
- Place the ring of your springform pan over/around the dough circle to contain it. Then cover loosely with a thin kitchen towel and let the dough rise in a warm place for 30 minutes.
- Meanwhile, pre-heat your oven to 350 degrees. Position an oven rack in the middle position.
- Remove the kitchen towel from the dough, but leave the springform pan in place. Transfer the baking sheet to your pre-heated oven and bake for about 30 minutes, or until the bread is golden brown and puffed. Then remove the baking sheet from the oven and allow the bread to cool for 10-15 minutes before carefully sliding it off onto a wire rack to continue cooling.
- While the bread cools, whisk together all of the ingredients for the glaze. Then drizzle the glaze over the bread before slicing and serving.
- This bread is best when it's enjoyed the day it's made. Leftovers can be stored in an airtight container at room temperature for about 2 days, and re-warmed slightly before eating.
SaveSave
SaveSaveSaveSave
SaveSave
SaveSave
SaveSaveSaveSave
SaveSave
SaveSaveSaveSave
SaveSave
SaveSaveSaveSave
SaveSave
SaveSave
SaveSave


This bread looks gorgeous, Liz! I think this belongs in a bakery! I love the cardamom and hazelnut combination. Such a wonderful treat!
Thanks, Gayle! Don’t give me any ideas about opening my own bakery. That could lead to trouble…! 🙂
Gorgeous!! I wouldn’t say I make the prettiest baked goods either – especially not breads – and you nailed this!! I love that it’s braided and so full of warm spices. I bet your mom was super proud of ya!
Mom was super proud. And even more so after she ate some! Thanks, Julia!
High five! Seriously that bread is gorgeous. I’m the same way. Cakes and cookies are not my thing. Sure I can bake them, but decorate? Heck no. I’m a “rustic” baker haha.
Glad we are on the same page, Carrie. Thanks!
Gorgeous, gorgeous bread, Liz! I love all the flavors you combined in the filling! I think I’m a little opposite of you, haha. I will decorate cakes all day long, but I am so terrible at yeast breads. You are clearly wonderful at it! 🙂
Oh thank you Beth! Maybe I’ll come over to your house and you can teach me your cake decorating ways!
This bread is simply stunning!! Bread and I have had a rocky relationship this year, but this beauty is swaying me to start over 🙂 Also, always yes to cardamom!
Cardamom is just the best this time of year. Thanks, Kelli!
Love it. Just absolutely love it.I’m starting to think that when we get together we need to swap treats for each other.
Oh my god so excited.
I just squealed with excitement!! XO
Wow, this is incredible, Liz. Almost too good to eat. How perfect is this for Christmas morning?!
“Almost” is the key word here. I admired it for a few minutes then shoved it in my face. Because, heck, that’s why we have photographs!!
That looks delicious! I bet if there are any leftovers it would make a killer bread pudding.
Oh that is a fantastic idea. I didn’t even think of that! Thanks, Jackie!
Liz, this Braided Cardamom and Chocolate-Hazelnut Bread is gorgeous!!!! I don’t know. . I’ve tried braiding bread before and suddenly, while doing it, my brain froze and I forgot how to braid!! haha!! Anyway, I need to try this! this is stunning!!! and maybe Santa would be ok if you left him some of this bread. 😛
Yeah, I’m pretty sure it’s the first thing I’ve actually braided in years! If Santa is nice to me this year, I’m totally down to share!
Looks beautiful! The state of art! I’m pretty sure it’s delicious too!
Thank you, Joanna!
That is one beautiful bread! Love the flavours you’ve got going here too 🙂
Thank you, Jennifer!
Beautiful!! I love the flavor combos, too! Looks like I found what I’m serving Christmas morning 🙂
Sounds like a fantastic plan, Maryanne!
This bread looks sooooo good! I’ve been salivating over it since I first saw it on Instagram!
Yeah! Thanks, Lisa!
Pingback: Link Love #66 | Barr & Table
Liz this is too gorgeous, love it!
Thank you so much, Emily! Let me know if you try it out!
This bread is so SO gorgeous, I could stare at it all day Liz!
Thanks, Beth! Gotta split your time between staring at it and eating it! 🙂
This is beautiful! I don’t blame you for being super proud of it =)
Thanks, Lauren!
Wow, this is stunning! I’m a big fan of chocolate + hazelnuts, but I wouldn’t have thought to use cardamom too – ingenious!
Thank you! Let me know if you try it out!
Well done Liz!! What a beautiful bread for indulging and gifting this holiday season!
Thanks, Mary Ann! XOXO!
That glaze is GORGEOUS!!
Thank you!
oh wow!! This is just stunning!
Thanks!
So beautiful! And sounds delicious too!
Thanks, Erin!
This epic bread is helping me move onto Christmas cheer!!
It’s very festive!
Dude, you did make something pretty, because that braided bread is gorgeous! Such a fun and festive sweet bread to serve during the holidays, I love it!
Thanks, Christina! I even surprised myself with this one. Lol!
I lol!! I’d call my Ma too! And I’d be just as proud of this stunning beauty. Your pastry work is gorgeous and the flavors sublime! I adore cardamom anything! I’ve made a few braided loafs, but haven’t put any up on the blog…. yet. It’s been a while since I’ve made one… I think it’s time to make it happen! Well done Liz!
You should totally make one for Christmas! It would be so festive!
Hi Liz,
This was wonderful and I shared the recipe with my friends. A few of them have food restrictions and were thinking of things they could sub out in different cases. Is there anything you would recommend for a gluten free flour option?
Thanks!
Hi Amanda! Glad you enjoyed it! Unfortunately I’m not fully experienced with baking GF yeasted breads. I typically choose King Arthur Flour’s all-purpose GF mix. But I haven’t tried it in this recipe so I can’t say for sure how it will turn out. If you get any insight, let me know!
I made this and it was awesome! My 7-year-old wasn’t a fan of the cardamom but I loved it. I got confused w/ the braiding instructions so found a youtube video of someone doing the same thing and it helped me visualize it. it was picture perfect!
I’m so glad it came out, Kaitee!
Can this be made overnight?
Hi Jenny, I think you could do the first rise overnight in your refrigerator. Then let it come to room temperature and complete the remaining steps the next day. Let me know if it works. I haven’t tried myself.
Hello.
I have a recipe very similar to this
( I think I’ll just switch to yours.) Anyway, a couple of comments:
I substituted 1/4 cup hazelnut flour for some of the regular flour.
A pizza cutter works better to slice the dough.
For a slightly more semetrical appearance, I slice the loaf completely. Then I make an X with the sliced parts facing up.
Start twisting the two strands from the center out. (One side of the X.) Then repeat with the remaining side. Spiral the completed loaf and proceed as directed.
Great tips, Karen!
I saw this recipe on Instagram and couldn’t resist making it. The recipe was well written and it came together very nicely. I took it to a church breakfast, and received many compliments, plus my husband wouldn’t stop eating it! I will be making this again. Thank you.
I love hearing that, Valerie!