
These days you’ll likely find me shuffling around the kitchen (possibly still in my pajamas), coffee in hand, flour across my brow and a smile on my face. Because there is nothing better than fall baking.
This year I’m determined to get more comfortable baking with yeast. Quick breads, scones, muffins and biscuits I can do with my eyes closed. No problemo. And I can make a pie crust LIKE A BOSS. But yeasted breads have always intimated me a bit. So I’m going to step up my bread-making game the next couple of months and master this. It’s a tough job, but somebody’s got to do it.
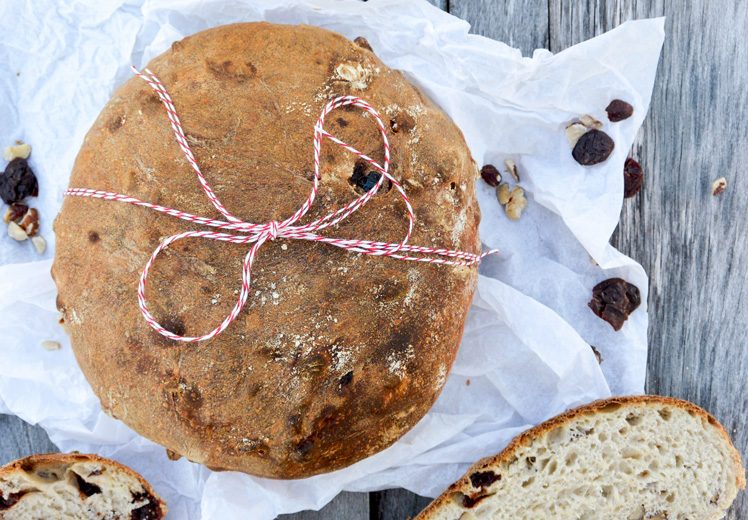
I was initially attracted to this recipe because of the flavors. Big hunks of tart cherries and toasted hazelnuts are a pretty unbeatable combination. But I was also drawn in by the technique, which involves making and using a sponge-starter. This was something new to me, so I figured if I’m ever going to “master” this whole yeasted bread thing then I better get out of my comfort zone (and maybe get out of my pajamas too).
A sponge-starter is like a lazy man’s version of a sourdough-starter. It’s a mixture of flour, water and yeast that is freshly made and then allowed to ferment overnight. It gives your bread some of the nuances that are characteristic of a sourdough loaf, but without all the babysitting and dedication required for a true sourdough-starter.
The recipe makes two good sized loaves. You can freeze one away for later or pass one along to your neighbors and rack up the karma points. Your choice. It’s excellent toasted with butter and makes great sandwiches as well.
Cheers,
Liz
Recipe from fiveandspice via Food52


Ingredients
- For the Sponge
- 3/4 cups water
- 1 1/4 cups all-purpose flour
- 1/4 tsp. active dry yeast
- For the Dough
- 1 1/4 cups lukewarm water
- 3 3/4 cups all-purpose flour, plus more as needed
- 1/4 cup honey
- 2 tsp. salt
- 1 cup roasted hazelnuts, roughly chopped
- 3/4 cups dried tart cherries
- Yellow cornmeal for dusting the baking sheet
Instructions
- Make the sponge. In a medium bowl, mix together the water, 1 cup of the flour and the yeast. Cover and let it rest at room temperature for 4-8 hours. Bubbles should have formed at the surface. Then stir in the remaining 1/4 cup of flour, cover and refrigerate overnight.
- Make the dough. In your stand mixer with the bread hook attachment, combine the water and the flour until they just combined. Cover the bowl and let it stand for 10-20 minutes. Then add the honey, salt and the sponge. Mix on low-medium speed for 3-4 minutes. If the dough is very wet, you can add a few more tablespoons of flour. The dough should be supple and somewhat sticky. Add the hazelnuts and cherries, mixing on low speed for an additional 4-5 minutes, pulling the dough down off the hook as needed. Gather up the dough with your hands, shape it into a ball and transfer it to a lightly oiled bowl, turning the dough to coat it with the oil on all sides. Cover the bowl with a kitchen towel and let the dough rise in a warm area for 2-3 hours. The dough will rise only a small amount (i.e. not a full doubling).
- After 2-3 hours, remove the dough from the bowl and place it on a well floured surface. Divide the dough into two equal sized pieces. Using floured hands, re-shape each piece into a ball and place them on a large baking sheet dusted with cornmeal. Cover with plastic wrap and let rise for another 3 hours in a warm area.
- Pre-heat your oven to 450 degrees. Place an oven-safe baking dish on the lowest rack to heat while the oven comes up to temperature. Remove the plastic wrap from the dough and transfer the baking sheet to your pre-heated oven. Carefully add about 2 cups of water to the heated baking dish and immediately close the oven door to trap the steam. Bake the loaves for 30-40 minutes. The tops should be deeply golden brown. Remove from the oven and transfer the loaves to a wire rack to cool. Allow to cool completely before slicing.
- Wrap the cooled loaves tightly and store at room temperature for 2-3 days or freeze for later.
Notes
1. If you have an recently fed sourdough-starter, you can use that in place of the sponge-starter. You will need 12 ounces.


I agree, there is nothing better than fall baking! I’m blown away by the flavor of this bread, Liz! I absolutely love the cherry and hazelnut combo! What a great bread. Pinned!
Yeah! Thanks, Gayle!
What a beautiful loaf of bread, Liz! Right up my alley 😉 Love the cherries and hazelnuts.
Thank you Jennifer! Hopefully we can bake bread together some day!
Fall baking is the best, as is baking in PJs in general. Loove the airy pockets in this loaf. And any dried fruit in bread is a treat!
Oh yes, PJ’s are a requirement!
This bread sounds delicious.
Thanks, Vanessa!
Absolutely awesome bread. Isn’t bread-making therapeutic?
Absolutely!
I need to become friendlier with yeast, myself. My experience with yeast is limited to making gluten-free pizza dough, and I’d love to start incorporating it into my breads and pancakes! This cherry hazelnut bread looks absolutely mouth-watering! I’d love to slather it in butter and enjoy it alongside a cup of coffee. Brilliant!
Thank you, Julia! It’s excellent with butter and coffee! Wish we could practice baking with yeast together…maybe someday soon! 🙂
Such a delicious looking bread!!
Thank you!
Such a pretty bread Liz! I’m like you ….I have yet to master bread making and it’s on my to do list.
We should do it together, Katya! At least in spirit!
This looks great! I am definitely going to give this a try! There is something about bread baking that makes me happy! (And I always have certain music that I like to listen to while baking bread…ha! Weird:))
Not weird at all! And I think the yeast probably like the music too. Happy yeast = good bread! Let me know if you try it out.
I love bread with nuts in it, and the cherry hazelnut combo is so delicious! I can smell it from here!
Mmmm…nothing beats the smell of fresh baked bread. Thanks, Marcie!
Cherries and hazelnuts- YUM! Love the flavor combo. And I feel the same way about yeast. Bravo! Looking forward to learning from your experience 😉
Thanks, Allie! I think my belly is going to thoroughly enjoy my new project!