
It initially felt cute to name these cookies “Rudolph’s Red Nose Cookies”. But I thought better of that in the end. Because I figured the Google machine probably wouldn’t have liked that description.
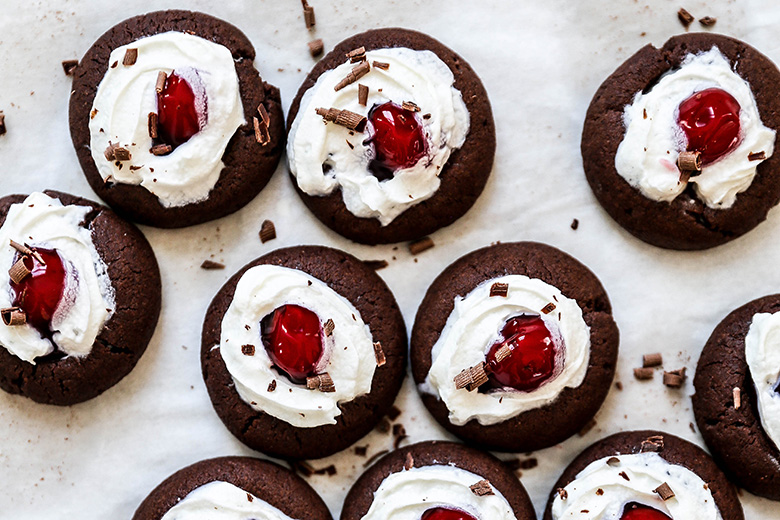
In my head, I’m still calling them that. But we can “officially” refer to them as Black Forest Thumbprint Cookies.
But whatever you call them, they are cute and festive! And I hope you’ll have the chance to try them out before Christmas!
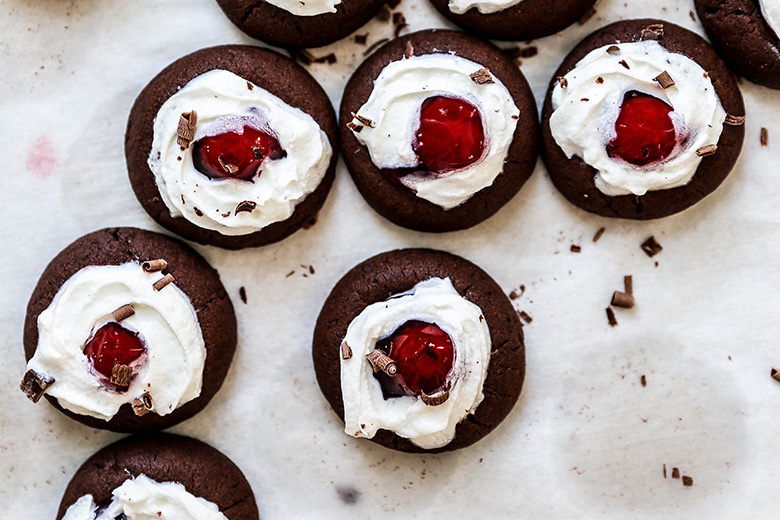
These cookies are based off my Chocolate Covered Cherry Cookies, which are one of my favorite Christmas cookies from childhood. And from adulthood too, I suppose. Because I still make them for myself almost every year. The original cookie has a chocolate cake-like cookie bottom, a maraschino cherry in the center and a thick chocolate frosting on top. Since they already had some of the makings of a black forest cake, it wasn’t much of a stretch to turn them into these Black Forest Thumbprint Cookies.
I kept the cookie dough recipe the same, but I prepared them how I would any other thumbprint cookie. Once cooled, I filled the center of each cookie with cherry pie filling, added a swirl of whipped cream topping around the outside, and then finished them with some chocolate shavings. Easy as {cherry} pie!
Since we’re getting down to the wire with respect to Christmas, I wanted to keep this recipe low fuss and low stress. So I used store-bought cherry pie filling and aerosol/spray whipped cream topping. Which made these cookies so fun and easy to decorate! Oh and for the chocolate shavings, simply use a standard vegetable peeler on a small square of semi-sweet or dark chocolate.
Once you add the cherry pie filling and whipped cream topping (step 7 in the instructions below), these cookies do have an expiration date. If they’re not being served right away (or if you have leftovers), they should be refrigerated. But even then, the whipped cream topping will start to deflate. And I’m not so keen on eating refrigerated cookies. To solve these issues, I like to make the cookies through step 6 in the instructions below. Because at this point, they can be stored in an airtight container at room temperature for up to a week. Then just before serving, I’ll decorate only as many as I’ll need for the day (this is why using store-bought toppings is key or this particular recipe). This is the best strategy I’ve found to keep them looking cute and tasting fresh!
Cheers,
Liz

Black Forest Thumbprint Cookies
Ingredients
For the Cookie Dough:
- 1 1/2 cups all-purpose flour
- 1/2 cup unsweetened cocoa powder
- 1/4 tsp. baking powder
- 1/4 tsp. baking soda
- 1/4 tsp. salt
- 1 cup granulated sugar
- 1/2 cup (8 tablespoons) unsalted butter, softened at room temperature
- 1 egg, at room temperature
- 1 1/2 tsp. vanilla extract
For Topping:
- About 1 cup cherry pie filling (1 cherry/cookie)
- Whipped cream topping (I used the aerosol/spray kind)
- Chocolate shavings
Instructions
- Pre-heat your oven to 350 degrees. Line two large baking sheets with parchment paper and set aside.
- In a medium bowl, stir together the flour, cocoa powder, baking powder, baking soda and salt. Set aside.
- In the bowl of your stand mixer fitted with the paddle attachment, cream together the sugar and butter on medium-high speed. Scrape down the sides and bottom of the bowl. Then add the egg and vanilla extract and beat until well combined. With your mixer on low speed, slowly add in the dry ingredients, beating just until combined and stopping to scrape down the sides and bottom of the bowl as necessary.
- Scoop out all the cookie dough and roll it into balls, using a rounded tablespoon of dough per ball. Place the balls on your parchment paper lined baking sheets, spacing them about 1 1/2-inches apart from each other. Then using your thumb or the back of a spoon, gently press into the center of each ball, going no more than halfway through the ball, to create an indentation.
- Transfer the baking sheets to your pre-heated oven and bake the cookies for 10-11 minutes. The cookies will have puffed up and should look set around the edges. Remove the baking sheets from your oven. While the cookies are still warm, gently press down into the center of each cookie where you made the initial indentation to deflate it slightly. You can use the back of a spoon or dip your thumb in cool water if you want to do this by hand. Then let the cookies cool for 5 minutes on their baking sheets before transferring them to a wire rack to continue cooling.
- Once the cookies have cooled completely, they can be transferred to an airtight container and stored at room temperature for 6-7 days.
- To serve, spoon 1 cherry (plus some of the filling) into the center of each cookie. Add a circle of whipped cream topping around each cherry. Then top with a few chocolate shavings. Enjoy immediately.


You have totally elevated the thumbprint cookie, Liz! Absolutely fabulous – and I love your name, regardless of what Google thinks/wants/computes lol! Happy Christmas Liz <3
They are cute and delicious no matter what you call them!