

This post was originally published here December 12, 2016. I’ve since updated the text and photographs. These two-bite treats are perfect for your Holiday cookie tray!
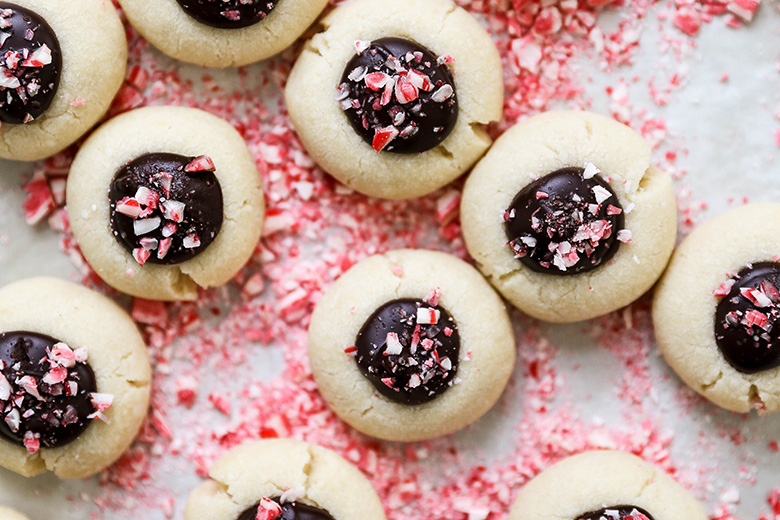
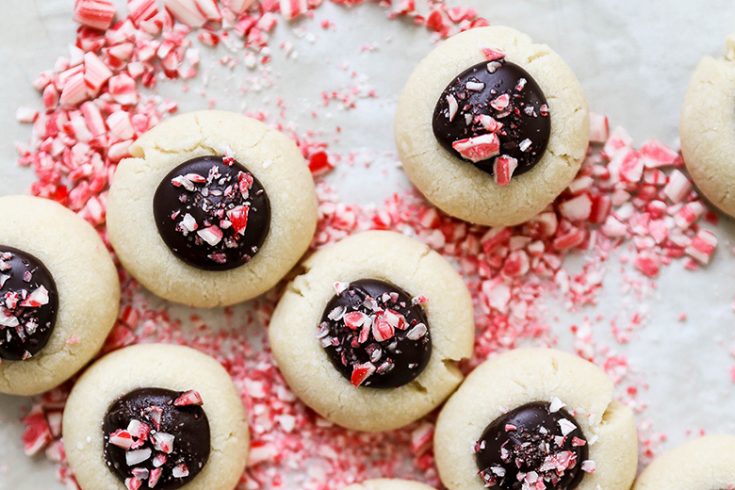
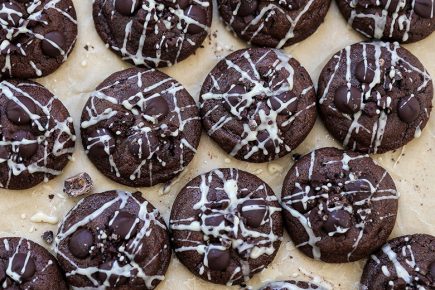
If you love the combination of peppermint and chocolate, then put these Peppermint Chocolate Thumbprint Cookies on your baking list this Holiday season! They’re a festive take on one of my all-time favorite cookies. And they are super easy, too! The ingredient list is simple and straight forward. And the dough doesn’t require any refrigeration before shaping and baking. So the time between you and cookies is short and sweet!
The peppermint flavor in these Peppermint Chocolate Thumbprint Cookies comes from a combination of peppermint extract in the dough and crushed peppermint candies on top. A little peppermint extract goes a long way, so measure this ingredient carefully and don’t just eyeball it (which admittedly I do a lot of the times with vanilla extract). Too much peppermint extract and your cookies will taste like toothpaste!
The baking method for these cookies is a bit different from other thumbprint cookie recipes. Instead of creating the indentations at the start, these cookies are partially baked before creating the indentations. This means that the cookies will be hot when you make the indentations. I still use my thumb for this part, dipping it in ice water periodically to keep it cool, but you might want to employ the back of a small spoon, a melon baller or even the end of a wine cork.
I kept these Peppermint Chocolate Thumbprint Cookies small, using only about 2 teaspoons of dough for each cookie. Which I think makes them extra cute. And it means I can try out more cookies on the cookie tray! I love that they can be devoured in just two-bites!
I fill these cookies with dark chocolate, but I think white chocolate would be equally delicious. The chocolate filling sets completely, so these cookies can be easily stacked for storage once they are cooled.
Cheers,
Liz
Peppermint Chocolate Thumbprint Cookies
Ingredients
For the Cookie Dough:
- 1 cup (16 tablespoons) unsalted butter, softened at room temperature
- 1 cup powdered sugar
- 1 tsp. vanilla extract
- 1 tsp. peppermint extract
- 1/4 tsp. salt
- 2 1/2 cups all-purpose flour
For Finishing:
- 3 ounces dark chocolate, chopped
- 2 tablespoons unsalted butter, cubed
- 1 tsp. light corn syrup
- Crushed peppermint candies
Instructions
- Pre-heat your oven to 350 degrees. Line two baking sheets with parchment paper and set aside.
- In your stand mixer fitted with the paddle attachment, beat together the butter, powdered sugar, extracts and salt until smooth and creamy, scraping down the sides and bottom of the bowl as necessary. Add the flour in thirds, beating on low speed after each addition. If your dough is crumbly at this point, add a tablespoon of cold water to help it come together.
- Roll the dough into small balls, using about 2 tsp. of dough for each ball. Place the dough balls 1-inch apart on your prepared baking sheets. Then transfer the baking sheets to your pre-heated oven and bake for 10 minutes.
- Remove the baking sheets from your oven. Press your thumb into the center of the partially baked cookies to make an indentation. You can dip your thumb in a small bowl of ice water, drying it in between, to keep your thumb cool. If you don’t want to use your thumb, you can use the back of a small spoon/melon baller or the end of a wine cork (or get creative with something else!).
- Transfer the baking sheets back to your pre-heated oven and continue baking the cookies for an additional 7-9 minutes. They will still be pale, but should look firm around the edges.
- Remove the baking sheets from your oven and immediately press down lightly on the indentations to further define/deflate them, using whichever method you prefer (you thumb, a small spoon, etc.). Allow the cookies to cool on their baking sheets for 5 minutes. Then transfer them to a wire rack to continue cooling.
- Once the cookies have completely cooled, combine the chocolate, butter and corn syrup in a small saucepan over low heat. Cook, stirring constantly, until everything is melted and smooth. Remove the saucepan from the heat and allow the chocolate to cool for about 5 minutes. Then spoon it into the indentations of the cookies.
- While the chocolate is still wet, top each cookie with a sprinkle of crushed peppermint candies.
- Allow the chocolate to fully cool and set before transferring the cookies to an airtight container for storage. Cookies can be stored at room temperature for up to 5 days.
Notes
Recipe adapted from Martha Stewart’s Cookies.


Ohhh these cookies look amazing, Liz!! I love the combination of chocolate and peppermint 🙂
Such a great flavor combo at Christmastime! I hope you try them out, Sarah!
White chocolate and peppermint make for such a perfect cookie combo! I’m also a sucker for those chocolate in the middle thumbprint cookies, so this is 100% happening for my cookie rotation 🙂
Make it happen, girl!
I’m with ya on cookie eating.. there’s SO much to love about them! Getting these buttery babies in my bellah fast is good too! I love the no chilling bit! Hooray! I’ll do this in one bite – and then we can wash it down with one of your incredible cocktails! xo
Cookies and cocktails sounds like a pretty fun date! 🙂
I’m all about ALL the cookies this time of year, too and I love how these cookies look like a work of modern art – the most delicious modern art around! Seriously swooning for these beauties!
Yes, definitely some food art going on. Thanks, Rachel! Hooray for cookie season!
LOVE these! Such a nice way to switch up the usual thumbprint. Plus that crazy drizzle just looks like too much fun to pass up. Gotta try these!
I went a little nuts with the drizzling! Messy, but fun!
I can’t even begin to tell you how beautiful these are!! Girlfriend. I want to eat these all up!!
Eat ’em up, babe! 🙂
What a super cute way to blend several Christmas cookies. Loving the drizzle…everything is better with drizzle!
Yup! The only bad part about the drizzle is the mess. Lol. Have a great Holiday, Karen!
These really look fun! And I think I could actually make them. The husband would be really excited, since I never make cookies.
I hope you try them out! Let me know!